
It’s often the unsung hero, the quiet starting point for countless dishes, and the one ingredient guaranteed to bring tears to your eyes. But the humble onion is so much more than just a culinary staple. It’s a powerhouse of flavor, a master of transformation, and an incredibly versatile and economical ingredient that deserves a spotlight in every smart kitchen.
Here at Infinitas Minds, I believe in empowering you with the knowledge to make the most of every ingredient, simplifying your cooking and maximizing your budget.
This comprehensive guide, brought to you by C. Holmes, is your definitive dossier on the onion. We’ll delve into its various types, demystify cutting techniques, explore how different cooking methods unlock distinct flavors, and uncover its incredible economic benefits.
Get ready to transform your relationship with this everyday vegetable, turning it from a simple ingredient into a strategic tool for delicious, frugal, and efficient home cooking.
You’ll understand its full potential, using it with intention and creativity to elevate every meal. Are you ready to unlock the secrets of the humble onion? Let’s get started!
The Mighty Onion: More Than Just Tears – A Kitchen Essential
Why is the onion so ubiquitous in nearly every cuisine around the world? Its magic lies in its ability to build layers of flavor, from pungent and sharp when raw, to sweet and mellow when cooked. Beyond its flavor contribution, the onion is a true workhorse in the smart kitchen due to its affordability, long shelf-life, and incredible versatility.
It’s often the very first ingredient to hit the pan, setting the foundation for countless dishes, from hearty stews to delicate sauces.
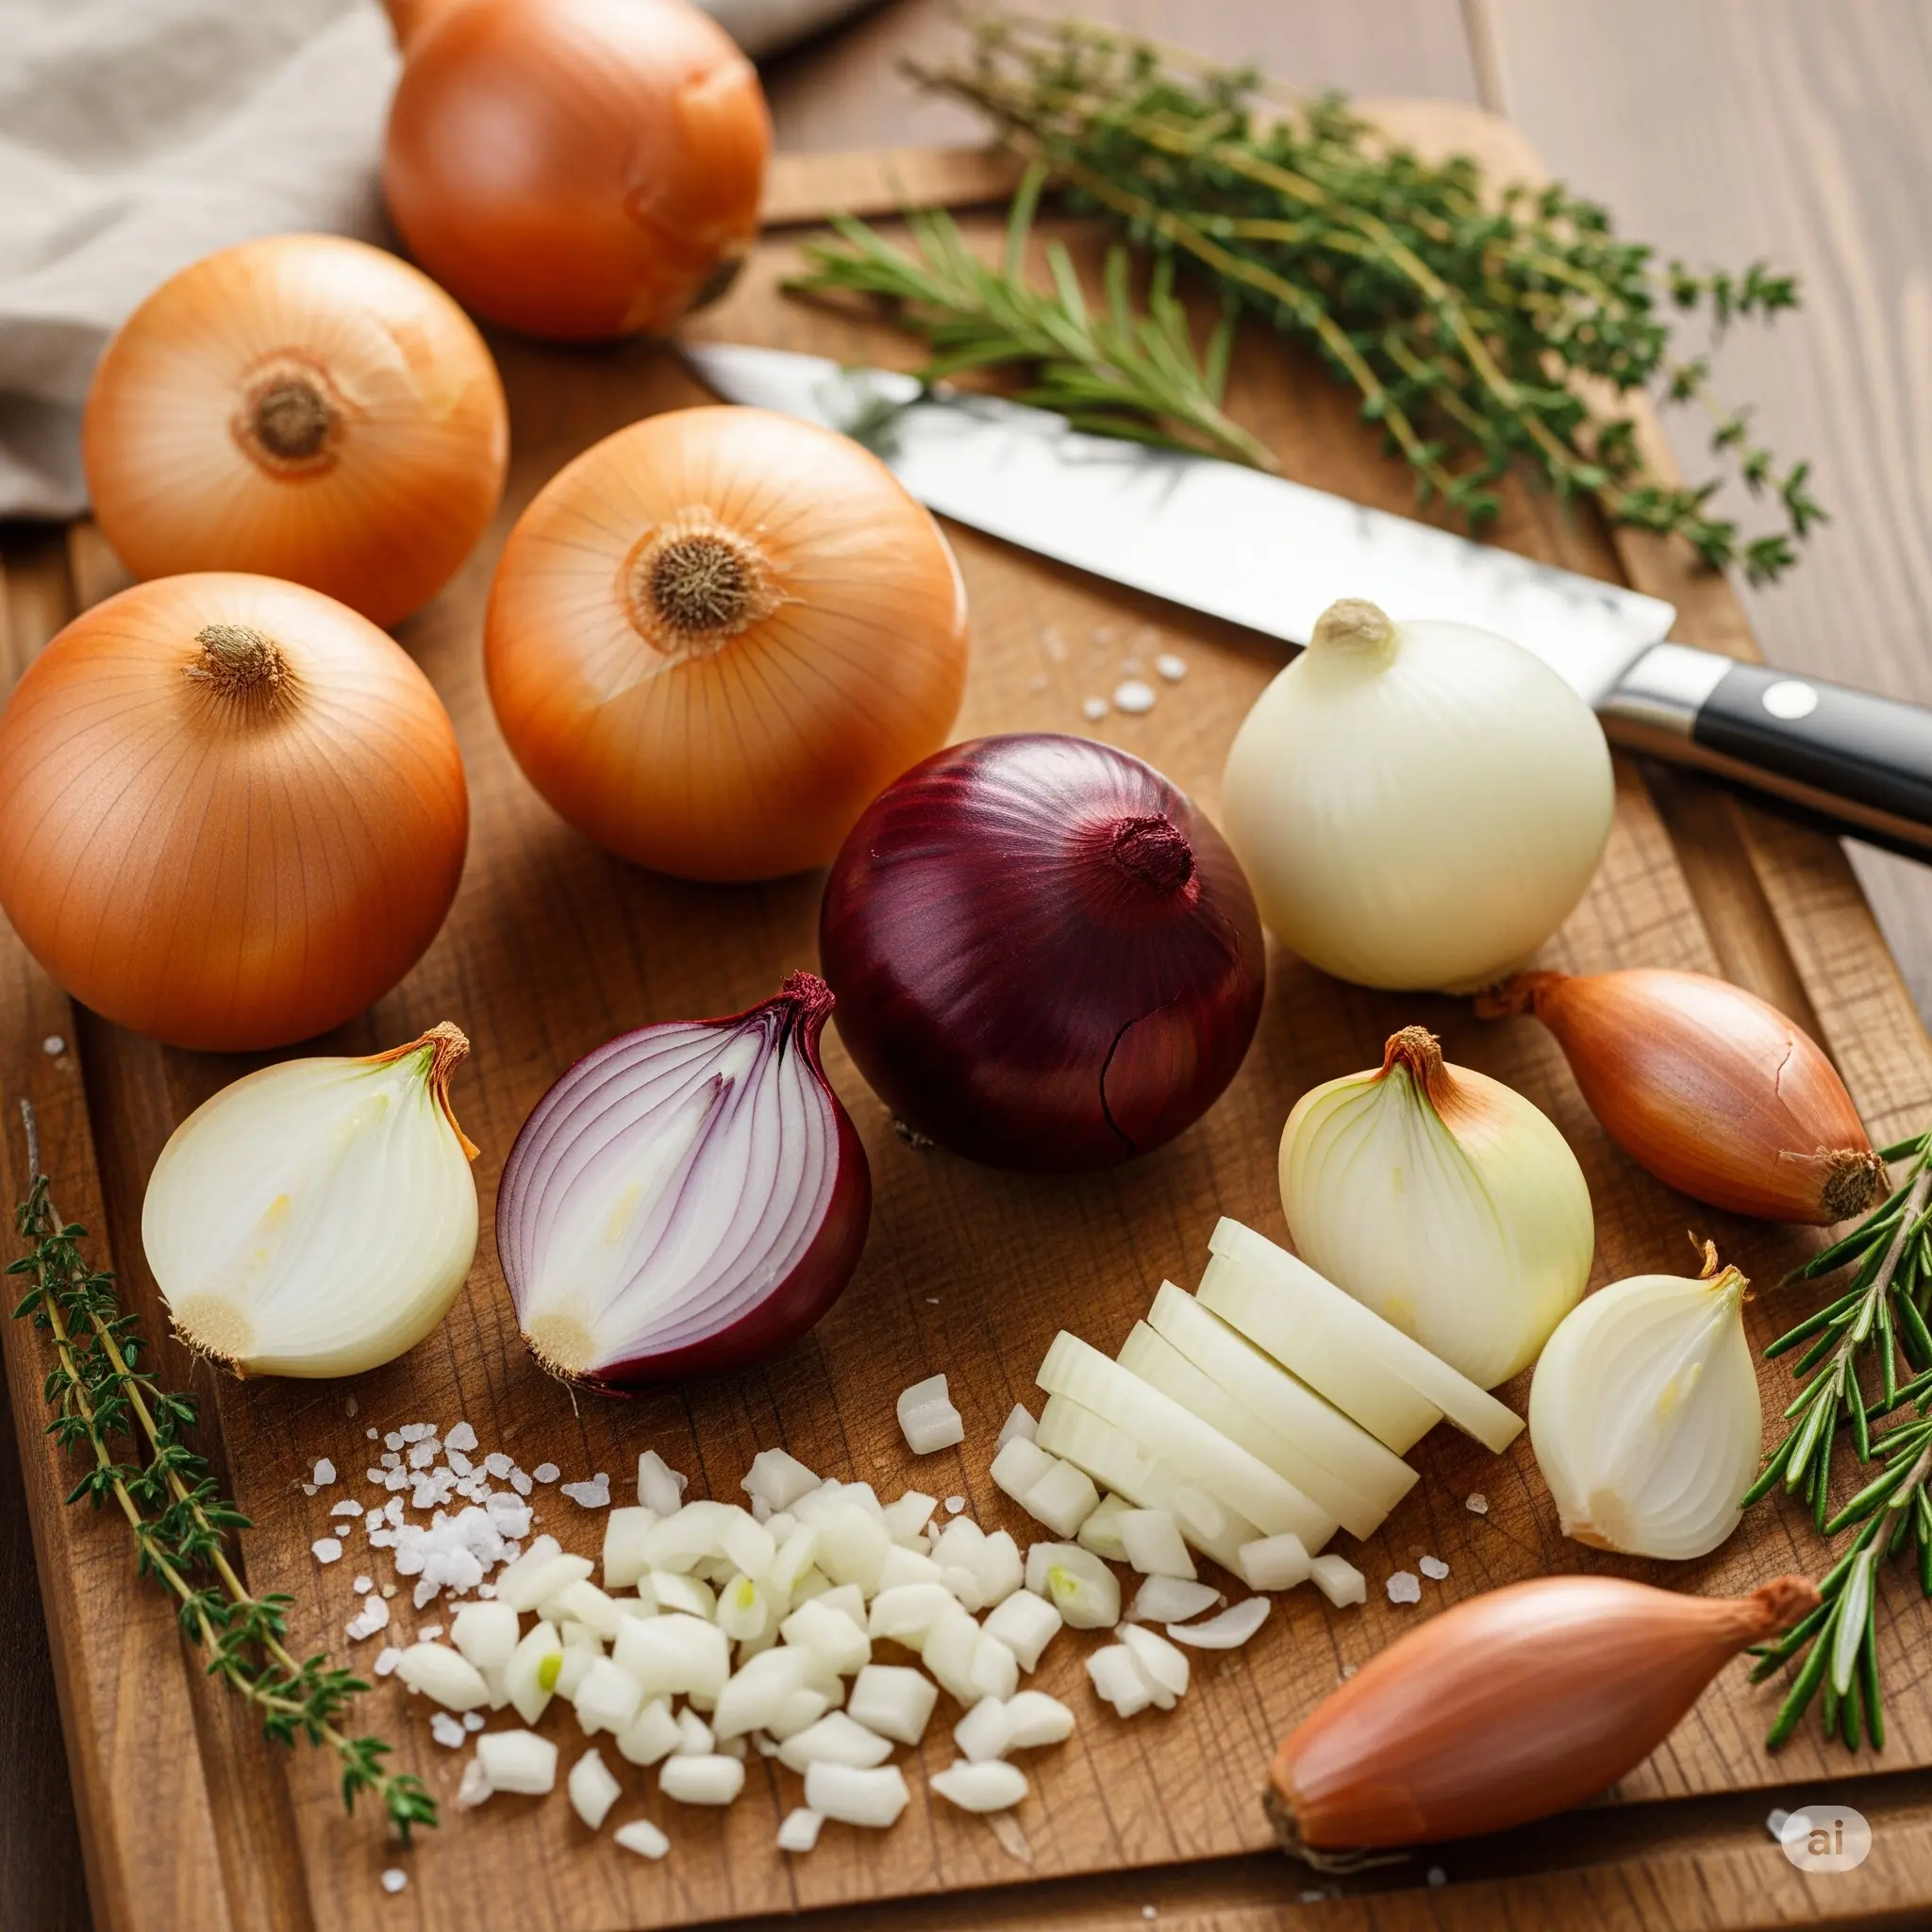
Understanding the different types of onion and their best uses is key to maximizing their potential:
- Yellow Onions: The most common all-purpose onion. Pungent when raw, but sweeten beautifully when cooked. Ideal for sautéing, roasting, caramelizing, and building flavor bases.
- Red Onions: Milder and sweeter than yellow onions when raw, with a vibrant color. Perfect for salads, sandwiches, pickling, and grilling.
- White Onions: Sharper and more pungent than yellow onions, with thinner skins. Great for salsas, fresh consumption, and dishes where a strong onion flavor is desired.
- Sweet Onions (e.g., Vidalia, Walla Walla): Very high in sugar, making them exceptionally mild raw and incredibly sweet when caramelized or roasted. Excellent for onion rings or baked dishes.
- Shallots: Small, elongated, with a milder, more delicate, garlicky-onion flavor. Ideal for vinaigrettes, sauces, and fine dining.
Choosing the right onion for your dish is the first step to unlocking its mighty potential and mastering its use in your smart kitchen.
Onion Basics for Beginners: Types, Selection, and Fundamental Prep
For beginners, the world of onions might seem a bit daunting beyond the basic yellow variety. But don’t worry! Understanding the different types, how to choose the best ones, and mastering basic preparation is crucial for anyone looking to incorporate the onion effectively into their cooking. This foundational knowledge will reduce kitchen mishaps and boost your confidence.
Types of Onion (Recap for Beginners):
- Yellow: Your everyday cooking onion.
- Red: Best for raw uses or pickling.
- White: Pungent, good for salsas.
- Sweet: Great for caramelizing.
- Shallots: Delicate, garlicky flavor.
Choosing the Best Onion:
- Look for onions that are firm to the touch, with dry, papery outer skins.
- Avoid any with soft spots, sprouts, or a strong odor from a distance (which can indicate spoilage).
- Heavier onions often indicate more moisture and freshness.
Basic Preparation (The First Cut):
- Trim the Ends: Cut off the very top (non-root end) and the root end, but leave a small portion of the root intact to help hold the onion together while cutting.
- Peel: Remove the dry, papery outer layers.
- Halve: Cut the onion in half lengthwise, from the root end to the stem end.
- Ready for Cutting: Your onion is now ready for specific cutting techniques.
Mastering these basic steps sets you up for success with any onion recipe.
Mastering Onion Cutting Techniques: From Tears to Perfect Chops
The way you cut an onion dramatically affects its flavor, texture, and how it cooks in your dish. Mastering these techniques not only makes cooking more efficient but also helps minimize those notorious tears.
- Dicing: The most common cut, used for building flavor bases in soups, stews, sauces, and stir-fries.
- Halve the peeled onion lengthwise, root end intact.
- Place cut side down. Make horizontal cuts towards the root, without cutting through the root (this keeps layers attached). The number of cuts depends on desired dice size.
- Make vertical cuts from top to root, again not cutting through the root.
- Slice crosswise from the top to the root. The onion will fall into even cubes.
- Slicing (Thin or Thick): Ideal for sautéing, caramelizing, or adding to sandwiches and salads.
- Halve the peeled onion lengthwise, root end intact.
- Place cut side down. Slice thinly or thickly crosswise from the stem end to the root end, letting the natural layers separate into rings or half-moons.
- Julienne (Fine, Long Strips): Used when you want a finer, more elegant slice for stir-fries, garnishes, or quick sautéing. This is essentially very thin slices.
- Minced: For when you want the onion flavor to disappear into the dish, like in dressings, meatballs, or delicate sauces. Follow the dicing method, but make your horizontal, vertical, and crosswise cuts much closer together for tiny pieces.
Mastering these cuts is a key skill for any aspiring smart cook, ensuring your onion integrates perfectly into your dishes.
Unlocking Flavors: Different Ways to Cook Onion
The onion is a flavor chameleon. The way you cook it profoundly changes its character, transforming its pungent raw bite into layers of sweetness, umami, or gentle aromatic notes. Understanding these transformations is key to unlocking the full potential of the onion in your smart kitchen.
- Sautéed: The most common starting point for many dishes.
- Technique: Cook chopped or sliced onion in a little fat (oil or butter) over medium heat until softened and translucent, usually 5-8 minutes.
- Flavor Profile: Mild, sweet, and aromatic. The base for soups, stews, sauces, and stir-fries.
- Caramelized: The slow, patient magic that turns onions into a deep, rich, sticky-sweet delicacy.
- Technique: Slice onion thinly. Cook slowly over low heat with a little fat, stirring occasionally, for 30-60 minutes until deep golden brown and soft. Natural sugars caramelize.
- Flavor Profile: Intense sweetness, rich, savory, umami. Perfect for burgers, sandwiches, tarts, and as a topping.
- Roasted: Roasting brings out a wonderful sweetness and tender texture.
- Technique: Cut onion into wedges or thick slices. Toss with olive oil, salt, and pepper. Roast at 400°F (200°C) until tender and caramelized (about 25-40 minutes).
- Flavor Profile: Sweet, slightly charred, tender. Great as a side dish or added to grain bowls. (This complements our guide on “Roasting Vegetables” for maximizing flavor and economy).
- Fried/Crispy: Creates a delightful crunchy texture and concentrated flavor.
- Technique: Thinly slice onion (e.g., white or yellow). Toss lightly in flour (optional). Fry in hot oil until golden brown and crispy.
- Flavor Profile: Crispy, intensely savory, slightly sweet. Excellent as a topping for burgers, casseroles, or green bean casserole.
By mastering these different cooking methods, you transform the versatile onion into a powerful tool for flavor creation in your home.
Onion Storage Secrets: Longer Freshness, Guaranteed Savings
Proper storage is key to extending the life of your onion supply, preventing waste, and ensuring you always have this essential ingredient on hand. The wrong storage can lead to sprouting, mold, or spoilage, costing you money.
- Whole, Unpeeled Onions (Yellow, Red, White, Sweet):
- Ideal: Store in a cool, dark, dry, and well-ventilated place (e.g., a pantry, cellar, or basket in a cupboard).
- Avoid: Do NOT store in the refrigerator, as the moisture and cold can make them soft and moldy faster. Do NOT store with potatoes, as both release gases that accelerate spoilage in the other.
- Longevity: Can last for several weeks to a few months.
- Peeled or Cut Onion:
- Ideal: Store in an airtight container or tightly wrapped in plastic wrap in the refrigerator.
- Longevity: Lasts for 7-10 days. The strong odor will be contained.
- Cooked Onion:
- Ideal: Store in an airtight container in the refrigerator.
- Longevity: Lasts for 3-4 days.
- Freezing: Cooked, chopped, or caramelized onion freezes beautifully for up to 3 months. Portion them into ice cube trays or small freezer bags for quick additions to future dishes. This is an excellent meal prep hack for flavor bases! (Learn more about freezer storage in our “Meal Prep for the Real World” guide).
By applying these storage secrets, you’ll ensure your onion stays fresh, reducing waste and contributing to your smart kitchen’s economy.
The Onion Beyond Flavor: Smart & Economical Uses in Your Kitchen
The onion isn’t just about adding flavor to your main dishes; its versatility extends to smart, economical uses that often go overlooked. From transforming scraps into rich broths to unexpected natural applications, the humble onion truly proves its worth as a kitchen hero.
- Homemade Broths and Stocks: Don’t throw away the papery outer layers, root ends, and trimmings of your onions! Collect them along with other vegetable scraps (carrots, celery, garlic peels) in a bag in the freezer. When you have enough, simmer them in water for a rich, flavorful, and free homemade vegetable broth. This is excellent for soups, risottos, and sauces, saving you money on store-bought broth.
- Natural Preservatives: Raw onion has antimicrobial properties. A cut onion placed near other fruits or vegetables can sometimes help prevent spoilage. However, this is not a substitute for proper refrigeration and should be used with caution.
- Home Remedies (with disclaimers): Historically, onions have been used in various home remedies for coughs and colds. While I encourage exploring traditional wisdom, always remember that this information is for educational purposes only and is not a substitute for professional medical advice. Always consult a healthcare professional for health concerns. Our focus at Infinitas Minds is on home economics and practical living, not medical advice.
- Cleaning Applications: Due to their acidity, cut onions can sometimes be used to clean grill grates or remove stubborn stains on metal, showcasing an unexpected, economical use beyond the plate.
These intelligent uses highlight how the onion extends its value, turning potential waste into new resources and contributing to a truly resourceful and economical home.
Simple & Flavorful Recipes Featuring the Star Onion
To truly celebrate the versatile onion, let’s explore some simple yet incredibly flavorful recipes where this humble ingredient shines. These dishes are not only delicious but also demonstrate the economy and versatility of the onion in everyday cooking.
1. Classic French Onion Soup (Simplified Version)
A comforting classic, simplified for your smart kitchen.
Ingredients:
- 2 tbsp butter or olive oil
- 4-5 medium onions (yellow or sweet), thinly sliced
- 1 clove garlic, minced
- 6 cups beef or vegetable broth (homemade for extra savings!)
- 1/2 cup dry white wine (optional, can substitute with more broth)
- Salt and black pepper to taste
- Toasted bread and grated cheese (optional, for serving)
Instructions:
- In a large pot or Dutch oven, melt butter/oil over medium-low heat. Add the sliced onions.
- Cook onions slowly for 25-35 minutes, stirring occasionally, until very soft and deeply golden brown (almost caramelized). Don’t rush this step; it’s the key to flavor!
- Add minced garlic and cook for 1 more minute until fragrant.
- If using, add white wine and scrape the bottom of the pot to release any caramelized bits. Cook for 2-3 minutes.
- Pour in the broth and season with salt and pepper. Increase heat to medium-high and bring to a simmer. Reduce heat to low and cook gently for 15-20 minutes for flavors to meld.
- Serve hot, optionally topped with toasted bread and grated cheese.
2. Boosted Scrambled Eggs with Sautéed Onion
A quick, economical, and flavorful twist on everyday scrambled eggs.
Ingredients:
- 1 tbsp olive oil
- 1/2 medium onion, thinly sliced
- 2 large eggs
- 2 tbsp milk or water (optional)
- Salt and black pepper to taste
- Grated cheese or fresh herbs (optional, for serving)
Instructions:
- In a non-stick skillet, heat olive oil over medium heat. Add sliced onion and sauté for 5-7 minutes until soft and translucent. Set aside.
- In a small bowl, whisk eggs with milk/water (if using), salt, and pepper.
- Pour egg mixture into the same skillet (add a little more oil if needed). Cook over medium heat.
- When edges begin to set, add the sautéed onion over one half of the eggs.
- When eggs are almost set, fold the omelet in half with a spatula. Cook for 1-2 more minutes.
- Serve hot, with cheese or fresh herbs if desired.
3. Versatile Caramelized Onions (Make a Big Batch!)
Make a large batch to use throughout the week! These are perfect for sandwiches, burgers, or as a side.
Ingredients:
- 3-4 large onions (yellow or sweet), thinly sliced
- 2 tbsp butter or olive oil
- 1 pinch of salt
- 1 tsp brown sugar (optional, to speed up process)
- 1/4 cup water or broth (for deglazing, if needed)
Instructions:
- In a large, heavy-bottomed pan (or Dutch oven) over medium-low heat, melt butter/oil. Add sliced onions and salt.
- Cook slowly, stirring every 5-10 minutes, for 45-60 minutes (or even longer), until onions are very soft, deep golden brown, and intensely sweet. If they start to dry out and stick to the bottom, add a splash of water or broth to deglaze.
- Store in an airtight container in the fridge for up to 5 days or freeze in portions for future use. (See our storage tips in the previous section!).
These onion recipes demonstrate how, with the right techniques, this humble ingredient can be the star of delicious and super economical dishes!
The Onion: Your Smart Kitchen Ally
The humble onion, often taken for granted, is in fact a powerful ally in your quest for a smarter, more economical, and flavorful kitchen. From mastering the diverse cutting techniques that transform its texture and taste, to the intelligent ways of cooking it to release distinct flavor profiles, the onion offers unparalleled versatility.
More than that, by learning how to store it correctly and utilizing every part (including scraps for broths), you not only reduce waste but also make significant savings in your home budget.
May this dossier inspire you to look at the onion with new eyes – not just as a basic ingredient, but as a fundamental tool for creating nutritious, delicious, and incredibly economical meals. Continue exploring the possibilities of your smart kitchen and discover how small adjustments and knowledge can generate big impacts on your life.
For more tips on maximizing every ingredient, explore our other Ingredient Dossiers and Planning Guides in the Smart Kitchen category!
FAQs: Your Onion Questions Answered by C. Holmes
Here are answers to common questions I receive about the onion:
- Why do my whole onions get soft quickly in the fridge? Whole, unpeeled onions should be stored in a cool, dark, dry, and well-ventilated place, like a pantry. The moisture and cold of the refrigerator can make them soft and moldy faster. Once cut or peeled, yes, they should go into an airtight container in the fridge.
- What’s the difference between a yellow and a sweet onion for cooking? Yellow onions are the most versatile all-purpose type, becoming sweet when cooked but starting with a more pungent flavor. Sweet onions (like Vidalia) have a naturally higher sugar content, making them exceptionally mild raw and incredibly sweet when caramelized or roasted, ideal for dishes where onion sweetness is the highlight.
- Can I freeze onions? How? Yes! You can freeze chopped, sliced, or caramelized onions. To freeze raw, spread pieces in a single layer on a baking sheet and freeze until solid. Then transfer to a freezer-safe bag or container. Caramelized onions can be frozen in small portions. They last up to 3 months in the freezer.
- My caramelized onions aren’t getting sweet. What am I doing wrong? The secret to caramelized onions is time and low heat. Don’t rush the process. You need to cook them slowly over low heat for a long period (30-60 minutes or more), stirring occasionally, for the onions’ natural sugars to break down and caramelize slowly. Using a heavy-bottomed pan also helps.
- Can I use onion skins for anything? Yes! The outer, papery skins of onions (the clean, brown or reddish ones) are excellent for adding color and depth of flavor to homemade vegetable or beef broths. Collect them along with other vegetable scraps in a freezer bag and use them to make a nutritious and flavorful stock, virtually free.
C. Holmes is the keen analytical mind behind Infinitas Minds, a blog dedicated to revolutionizing the way we approach home economics. With a meticulous eye for detail and a passion for logical solutions, C. Holmes tackles everyday challenges to reveal hidden opportunities for efficiency and savings. His mission is to simplify life, spark innovation, and offer practical, insightful approaches for navigating our often-complex world with greater ease and financial clarity.
Driven by a belief that true mastery of home economics lies in understanding the ‘why’ and ‘how’ behind every decision, C. Holmes curates comprehensive guides, actionable experiments, and groundbreaking perspectives. Expect a blend of sharp analysis, creative problem-solving, and a touch of ingenuity in every piece, empowering readers to transform their homes into havens of efficiency and peace.