
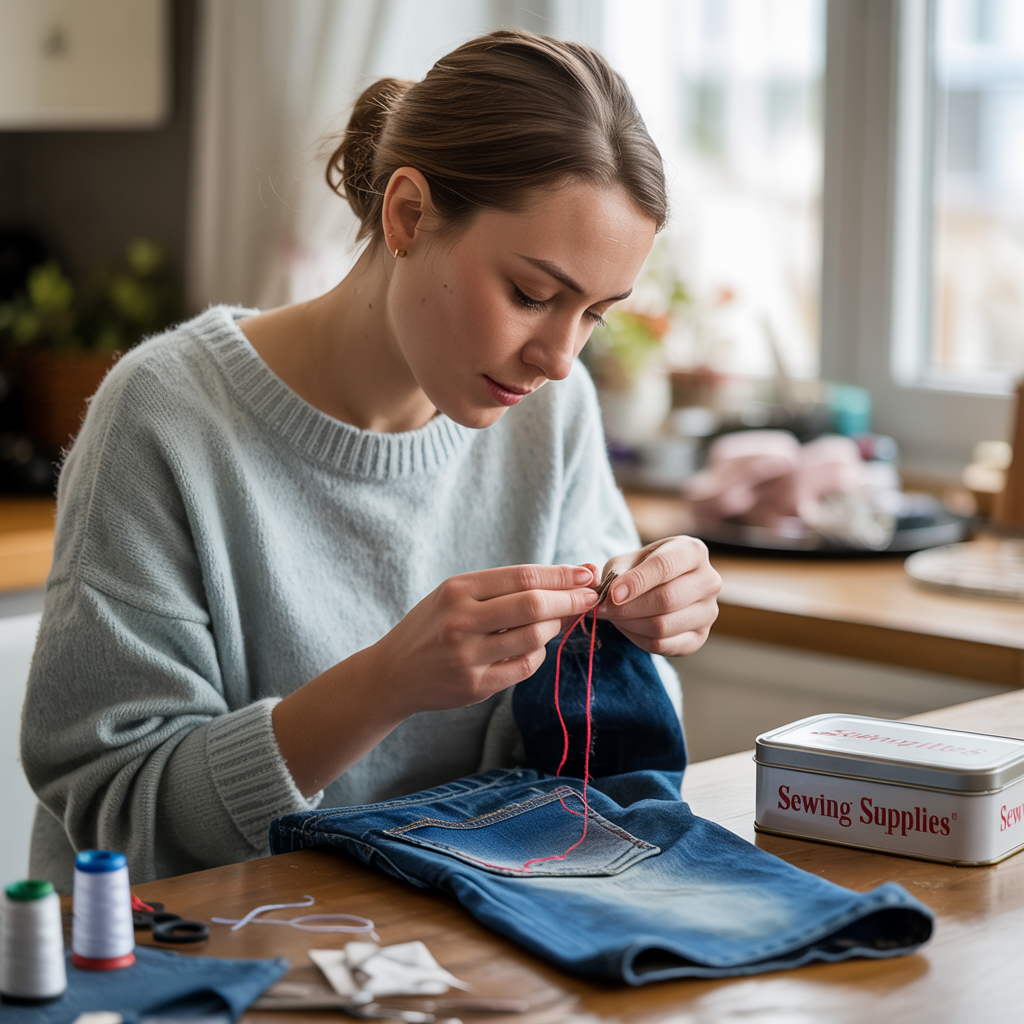
Want to save money and stop discarding perfectly fixable clothes simply because of a loose button or a fallen hem? My guide to basic clothing repairs for beginners is your answer, offering practical, thrifty stitches and straightforward solutions to keep your favorite garments in rotation and your wallet happier.
If you’re a budget-savvy individual or a student looking to stretch every dollar, learning a few simple mending techniques is one of the most valuable and empowering skills you can acquire. Forget paying for minor alterations or constantly replacing items; I’m here to show you how easy it can be to tackle these common wardrobe woes yourself.
This isn’t about becoming a master tailor overnight. It’s about demystifying a few essential hand-sewing skills that will allow you to confidently fix those annoying little issues that often lead to clothes being relegated to the back of the closet or, worse, the trash bin.
I’ll walk you through exactly what you need in a minimal, budget-friendly sewing kit, and then we’ll dive into step-by-step instructions for common repairs like sewing on buttons, mending small rips, and rescuing droopy hems – all explained in simple, jargon-free language.
I´ll teach you how to transform from someone who sighs at a snagged thread to a pragmatic problem-solver who sees a quick, economical fix. We’ll even explore the real financial impact of these simple skills. By the end of this guide, you’ll realize that a needle and thread are powerful tools for a more sustainable and cost-effective wardrobe. Let’s get those clothes back in action!
2. Your Thrifty Sewing Kit: The Absolute Must-Haves For Clothing Repairs (and What You Can Skip to Save Cash)
Before you can embark on your journey of basic clothing repairs for beginners and start saving serious cash, you’ll need a few trusty tools. Now, as a pragmatic problem-solver focused on budget-consciousness, I’m not going to tell you to rush out and buy a giant, expensive sewing kit filled with gadgets you’ll never use.
For the simple, effective repairs we’re going to cover, your thrifty sewing kit can be assembled with just the absolute must-haves, and I’ll even tell you what you can confidently skip to save even more. The goal is to get you mending effectively with minimal upfront investment.
Here’s what I consider essential for your starter kit:
Needles – Your Primary Tool:
What you need: A small variety pack of hand-sewing needles, often labeled “sharps.” These come in different sizes (thickness and length) and eye shapes. Having a few options means you’ll have the right needle for different fabric weights.
Thrifty Tip: You don’t need dozens. A basic pack with 5-10 assorted sharps is usually very inexpensive and will last you a long time.
Thread – The Binding Force:
What you need: All-purpose polyester thread is your best bet for versatility and strength. It works well on most fabrics.
Thrifty Tip: Start with a few basic colors that will match most of your wardrobe: black, white, navy, and a neutral beige or gray. You can often buy small spools individually or in a small multi-color pack very cheaply. Avoid buying giant spools of colors you’ll rarely use unless you find an amazing deal.
Small, Sharp Scissors – For Clean Cuts:
What you need: A pair of small, sharp scissors dedicated only to cutting thread and fabric (if you need to trim a small patch, for example). Using them for paper will dull them quickly.
Thrifty Tip: Embroidery scissors or even small, sharp craft scissors can work perfectly well and are often cheaper than specialized “sewing shears” if you’re just starting with thread snipping.
Optional but Highly Recommended (and Still Cheap!):
Seam Ripper: This little tool with a hooked blade is a lifesaver for picking out stitches if you make a mistake or need to remove an old, broken seam. It’s far more effective and safer for your fabric than trying to use scissors. They are usually very inexpensive.
Straight Pins: A small handful of basic straight pins can be incredibly helpful for holding fabric in place while you sew, especially for hems or patches. Again, a small, cheap pack is all you need.
Simple Thimble: If you’re not used to hand sewing, a thimble (a small protective cap for your finger) can save you from a few sore spots when pushing the needle through thicker fabrics. Metal or plastic ones are very cheap.
What You Can Likely Skip (For Now, to Save Cash):
Fancy measuring tapes (a regular ruler often works), specialized marking tools (a sliver of soap can mark dark fabric temporarily), a pincushion (you can keep pins in their original packet), or a sewing machine. We’re focusing on hand-sewn basic clothing repairs for beginners here, keeping it simple and ultra-economical.
With just these few core items, most of which you might even find in a basic “emergency” sewing kit from a dollar store (though investing a tiny bit more in decent needles and thread is worthwhile if you can), you’ll be well-equipped to tackle the common clothing repairs we’ll cover next and start padding your pockets with those sweet, sweet savings!
3. The Loose Button Lifesaver: A 5-Minute Fix to Keep Your Shirts and Pants in Action
Alright, pragmatic problem-solvers, let’s dive into our first hands-on lesson in basic clothing repairs for beginners: the loose button lifesaver! This is an incredibly common wardrobe malfunction, but thankfully, it’s also one of the easiest and quickest to fix – often in just 5 minutes. Learning to securely reattach a button means you can rescue those shirts, pants, or cardigans from the “unwearable” pile and save yourself the cost and hassle of replacing them or paying someone else for such a simple job. This fix alone will start putting money back in your pocket.
No more safety pins or hoping no one notices! Here’s my straightforward, no-nonsense method:
Step 1: Gather Your Supplies (from Your Thrifty Kit!)
The loose or detached button. (If you’ve lost the original, try to find a close match from your “spare buttons” jar – most new clothes come with one – or a very cheap replacement from a craft store. Sometimes, an internal button from the same garment can be “borrowed” if it’s a perfect match for an external one.)
A needle that fits through the buttonholes.
Thread that matches your garment or the original button thread as closely as possible. (For a stronger hold, you can double your thread – I’ll explain below).
Your small, sharp scissors.
Step 2: Thread Your Needle and Tie a Knot
Cut a Length of Thread: About 18-24 inches is usually plenty. Too long, and it tends to tangle.
Threading: Push one end of the thread through the eye of the needle.
Doubling Up (Recommended for Strength): Pull the thread through so you have two equal lengths hanging from the needle. Take both loose ends together.
Tying the Knot: Wrap the two ends around your index finger a couple of times, roll the loops off your finger with your thumb, and then pull the loops tight to form a secure knot at the very end of the doubled thread. Snip off any long tail beyond the knot.
Step 3: Anchor Your Thread on the Fabric
From the Wrong Side (Inside) of the Fabric: Decide exactly where your button needs to go (you should see faint old stitch marks or an indentation). Push your needle up from the wrong side of the fabric through to the right side at this spot. Pull the thread all the way through until the knot catches on the wrong side.
Small Anchor Stitch: Make one or two tiny stitches right on top of each other on the right side of the fabric where the button will sit. This just gives your main stitches a firm base.
Step 4: Stitching on the Button
Position the Button: Place your button over your anchor stitches.
For a 2-Hole Button:
Bring your needle up through one hole of the button from the fabric side.
Go down through the other hole and back through the fabric to the wrong side, very close to where your thread first came up.
Repeat this up-and-down motion through the buttonholes and fabric about 4-6 times, keeping your stitches snug but not so tight that they pucker the fabric.
For a 4-Hole Button:
You can make parallel stitches (two holes, then the other two) or criss-cross stitches (forming an “X”).
Bring your needle up through one hole, down through its diagonal (or adjacent, for parallel) partner, and through the fabric. Repeat 3-4 times for that pair.
Then, bring your needle up through an unused hole and repeat the process with its partner.
Creating a Thread Shank (Optional, but good for thicker fabrics or a less “flat” button):
Before your last couple of stitches, or after them but before tying off, bring the needle up through the fabric under the button, but not through a buttonhole. Wrap the thread around the stitches between the button and the fabric several times (3-4 wraps). This creates a small “stalk” or shank, giving the button a little space. Then, push the needle back to the wrong side of the fabric.
Step 5: Secure Your Thread on the Back
On the Wrong Side of the Fabric: Make a few small stitches very close together, catching a few threads of the fabric under your previous stitches.
Loop and Knot: On your last stitch, before pulling the loop completely tight, pass your needle through the loop twice and then pull it tight to form a secure knot. Snip the thread close to the knot.
And that’s it! You’ve just performed a successful button lifesaver. This simple skill from your basic clothing repairs for beginners toolkit means one less garment heading for the donation pile prematurely and one less reason to spend money. Pragmatic and problem solved!
4. Conquering Minor Rips & Tears: Simple Stitches to Rescue Your Favorite Garments
Next up in our quest for basic clothing repairs for beginners is conquering those minor rips and tears that can sideline your favorite garments. A small tear along a seam or a little snag in the fabric doesn’t have to mean an expensive trip to the tailor or, worse, a premature farewell to a piece you love. As a pragmatic problem-solver, I can tell you that a few simple hand stitches are often all it takes to bring these items back from the brink, saving you money and extending their wearable life.
We’re not talking about complex reweaving here, just straightforward fixes for common issues. Remember to use a thread color that matches your fabric as closely as possible for the most invisible repair.
The Workhorse: The Basic Running Stitch (or Straight Stitch by Hand)
Best For: Repairing a straight seam that has come undone, or closing a small, clean tear in a fairly sturdy fabric where the edges can be brought together neatly from the wrong side.
How to Do It (Simply Put):
Prep: Turn the garment inside out. Thread your needle and tie a knot (doubled thread is good for strength).
Start: A little before the beginning of the rip, bring your needle up from the wrong side. Make a tiny backstitch or two to anchor your thread.
Stitch: Push your needle in and out of the fabric along the tear line, creating a series of small, even stitches (aim for about 1/8 inch or 3mm long, but don’t obsess over perfection). Try to catch both edges of the fabric if it’s a seam repair, or keep the stitches close to the tear if it’s a fabric rip you’re closing from behind.
Finish: Go a little past the end of the rip, make a couple of small backstitches to secure, then knot your thread on the wrong side and snip.
Pragmatic Tip: Keep your stitches relatively small and even for the strongest, neatest repair. Don’t pull the thread so tight that the fabric puckers.
The Sneaky Fix: The Slip Stitch (or Ladder Stitch)
Best For: Creating a nearly invisible closure on an open seam from the right side of the fabric (e.g., a ripped lining, a seam on a cushion, or where two folded edges need to meet). It’s also great for closing the opening after stuffing a plush toy.
How to Do It (The “Hidden Magic”):
Prep: Thread your needle and tie a knot. Hide the knot by bringing your needle up from inside one of the folded seam allowances (if possible) or from the wrong side very close to the start of the opening.
Stitch:
Take a tiny stitch (about 1/8 inch) directly across from where your thread emerged, picking up just a few threads of the fabric on the other side of the opening, along its folded edge.
Now, bring your needle directly across again and take a tiny stitch into the folded edge of the first side, parallel to your previous stitch.
Continue this “ladder” of small, alternating stitches, keeping them close to the folded edges. As you pull the thread gently taut (but not too tight!), the stitches should disappear into the seam.
Finish: Secure your thread with a small, discreet knot, perhaps tucking the tail inside the seam if possible.
Problem-Solver Insight: This stitch takes a little practice to get perfectly invisible, but it’s incredibly useful for those repairs where you don’t want your handiwork to show!
When a Simple Patch is Your Budget-Friendly Hero:
Best For: Small holes or tears that aren’t along a seam, or areas that need a bit of reinforcement.
Economical Options:
Iron-On Patches: These are super easy for beginners. You can buy them cheaply in various colors and sizes. Just follow the package instructions (usually involves placing the patch and pressing with a hot iron). They’re great for kids’ clothes or casual wear.
DIY Fabric Patch: Cut a small piece of fabric (a scrap from an old garment in a similar color/weight is ideal) slightly larger than the hole.
Option 1 (Internal): Place it on the inside of the garment, under the hole. From the right side, use small, neat running stitches or even tiny whipstitches around the edge of the hole to secure it to the patch.
Option 2 (External, more visible but can be decorative): Place it on the outside. Turn the raw edges of the patch under slightly and stitch it down all around with a running stitch or a decorative stitch if you’re feeling creative.
Pragmatic Choice: Patching is often the most durable and practical solution for holes, preventing them from getting bigger and significantly extending the life of the garment.
With these simple stitching techniques in your basic clothing repairs for beginners arsenal, you’re well on your way to rescuing more of your wardrobe from an untimely demise. Each mend is a little victory for your skills and your savings!
5. Fallen Hem Rescue Mission: An Easy No-Sew (or Minimal Sew) Fix for Droopy Trousers and Skirts
There’s nothing quite like the annoyance of a fallen hem on your favorite trousers or skirt to make you consider tossing an otherwise perfectly good garment. But hold on! Before you despair or reach for your wallet, this fallen hem rescue mission is a core part of basic clothing repairs for beginners, and I’m here to show you an easy no-sew (or, if you prefer, a minimal sew) fix.
As a pragmatic problem-solver, I love solutions that are quick, effective, and, most importantly, save you money and keep your clothes looking sharp. No more tripping over droopy fabric or resorting to safety pins as a permanent solution!
Here are two budget-conscious approaches to get those hems back in line:
Option 1: The No-Sew Super Saver – Fusible Hem Tape (Iron-On Magic!)
Best For: Beginners who want a super quick, no-sewing-required fix; good for medium-weight fabrics where a slightly stiffer hem isn’t an issue. It’s a lifesaver for last-minute emergencies!
What You’ll Need:
Fusible hem tape (available very cheaply at craft stores or supermarkets; it looks like a roll of thin, papery tape).
An iron and ironing board.
Scissors.
(Optional) A damp pressing cloth (like a thin cotton tea towel).
The Super-Simple Steps:
Prep Your Hem: Turn your garment inside out. Fold the fallen hem back up to its original correct length (you should see the old crease line). Press it firmly with your iron to redefine the crease. If it’s a new garment you’re hemming for the first time, ensure it’s the correct length and press a sharp crease.
Cut the Tape: Cut a strip of fusible hem tape the length of the section you need to hem (or around the entire circumference if the whole hem is down).
Position the Tape: Carefully place the hem tape inside the folded hem, between the two layers of fabric. Make sure the tape doesn’t peek out.
Iron to Fuse: Place your iron (set to the appropriate temperature for your fabric, often with steam, or use a damp pressing cloth between the iron and your garment to prevent scorching) over the hem area. Press firmly for the time recommended on the hem tape package (usually 10-20 seconds). Don’t glide the iron back and forth too much; press and lift. Work your way around the hem.
Let it Cool: Allow the area to cool completely before handling or wearing. This allows the adhesive to set properly.
Pragmatic Pros & Cons:
Pros: Extremely fast, no sewing skills needed, very cheap.
Cons: Can sometimes make the hem a bit stiff, may not last through dozens of washes like a sewn hem (but can often be reapplied if it comes loose). Not ideal for very delicate or very heavy fabrics.
Option 2: The Minimal Sew Fix – A Simple Hand-Sewn Hem (Simplified Blind Stitch or Whipstitch)
Best For: A more durable, flexible, and often more professional-looking finish; better for a wider range of fabric weights. Still very achievable for beginners with a little patience.
What You’ll Need: Needle, thread (matching your garment), scissors, (optional) straight pins.
The Easy Stitches (Focus on function for beginners, not perfection):
Prep: Turn garment inside out. Fold and press the hem to the correct length, just like for the tape method. You can use a few straight pins to hold it in place if you like.
Thread & Knot: Thread your needle (single thread is usually fine for hems) and tie a knot at the end.
The Simplified Approach (Whipstitch from the Inside):
Hide your knot inside the folded hem allowance.
Pick up just one or two threads from the main garment fabric very close to the folded edge of the hem.
Then, bring your needle diagonally up and through the folded edge of the hem allowance itself.
Repeat these small, evenly spaced diagonal stitches all the way around. The goal is for only tiny, almost invisible “dots” of thread to show on the right side of the garment.
Securing: When you reach the end, make a few small stitches on top of each other inside the hem allowance and knot your thread securely.
Pragmatic Perk: This hand-sewn hem will be much more flexible and generally longer-lasting than fusible tape. Even if your stitches aren’t perfectly invisible at first, they’ll still hold your hem up and save you money! Practice makes perfect.
Whether you choose the quick iron-on fix or the more traditional (but still simple!) hand-sewn approach, mastering this fallen hem rescue mission is a fundamental skill in your basic clothing repairs for beginners journey. No more droopy hems means more wear from your wardrobe and more cash in your pocket!
6. Beyond the Basics (But Still Budget-Friendly): Quick Tips for Common Annoyances
You’re doing great! You’ve already learned some core basic clothing repairs for beginners, from buttons to hems. Now, let’s go just a tiny step beyond the basics with some quick, still incredibly budget-friendly, tips for tackling those other common little wardrobe annoyances. As a pragmatic problem-solver, I know that sometimes it’s these small, nagging issues that can make a garment feel unwearable. These fixes are often super simple and can prevent minor problems from turning into major (and more expensive) ones.
Think of these as your bonus round of thrifty mending tricks:
Taming the Dreaded Snagged Thread:
The Problem: You’ve got a looped thread snagged on the surface of a knit sweater or a woven fabric, and your first instinct might be to cut it – don’t!
The Quick (and Correct) Fix:
Do NOT Cut the Snag: Cutting it will often create a hole or a run, especially in knits.
Gently Stretch the Fabric: Sometimes, gently stretching the fabric around the snag in all directions can help the loop retract slightly back into the weave.
The Needle Trick: Take a regular sewing needle (or a very fine crochet hook if you have one). From the wrong side (inside) of the garment, carefully insert the needle point right where the snag emerges on the right side. Wiggle it a bit to catch the loop of the snag.
Pull it Through: Gently pull the needle (and the snagged loop) through to the wrong side of the fabric. The loop should now be hidden on the inside.
Budget-Saving Impact: Prevents a small snag from becoming a run or a hole that might render the garment unwearable.
Reinforcing a Weak Seam (Preventative Maintenance!):
The Problem: You notice a seam (like an underarm seam or a side seam on pants) looking a bit stressed, with threads perhaps starting to pull apart, but it hasn’t fully ripped yet.
The Thrifty Fix:
Turn Garment Inside Out: Work from the wrong side.
Simple Backstitches: Using a matching thread, sew a line of small, strong backstitches directly over or just alongside the existing weak seam line. A backstitch is much stronger than a running stitch because each stitch overlaps the previous one. (A quick online search for “how to do a backstitch by hand” will show you this very simple, strong stitch).
Budget-Saving Impact: This proactive fix can prevent a major seam blowout, which would be a much bigger repair job or might lead you to discard the item. It’s a tiny bit of effort for a big potential saving.
Securing a Loose Drawstring or Shoelace Tip (No More Fraying!):
The Problem: The plastic or metal tip (aglet) comes off your hoodie drawstring or shoelace, and the end starts to fray and unravel, making it hard to thread.
The Quick Fixes:
Thread Wrap: Tightly wrap a few inches of matching (or contrasting, for fun!) thread around the frayed end, then tie it off securely. You can add a tiny dab of clear nail polish or fabric glue over the thread for extra durability.
Clear Nail Polish/Super Glue (Use Sparingly): For synthetic laces/drawstrings, you can sometimes carefully apply a very thin coat of clear nail polish or a tiny drop of super glue to the very tip to stop fraying, then trim any excess once dry. (Test on an inconspicuous area first, as glue can stiffen fabric).
Heat Shrink Tubing (For the More DIY-Inclined): Small heat shrink tubes (from a hardware or electronics store) can be slipped over the end and then gently shrunk with a heat gun (or sometimes even a hairdryer on high) to create a new, neat tip.
Budget-Saving Impact: Keeps your drawstrings and laces functional and looking neat, preventing the need to replace them or the whole garment just because of a frayed end.
These little “beyond the basics” tips are all about that pragmatic, problem-solving approach. They might seem minor, but mastering them as part of your basic clothing repairs for beginners skill set further empowers you to maintain your wardrobe effectively and economically, keeping more of your hard-earned cash where it belongs – in your pocket!
7. The Real Savings: How Mastering Basic Clothing Repairs for Beginners Pads Your Pockets
We’ve talked a lot about the “how-to” of these fixes, but let’s get down to the brass tacks, which I know my fellow budget-savvy individuals and students will appreciate: the real, tangible savings you unlock by mastering these basic clothing repairs for beginners. It’s not just about a few pennies here and there; the cumulative financial impact of being able to perform these simple mends yourself can genuinely pad your pockets over time. As a pragmatic problem-solver, seeing that direct cost benefit is incredibly motivating!
Think about these common scenarios and the money you keep by doing it yourself:
The Loose Button Scenario:
DIY Cost: Literally pennies for a bit of thread. You probably already have a spare button or can find one for next to nothing.
Cost of a Tailor: A professional might charge 5−5−10 (or more, depending on your location and the garment) just to sew on a single button.
Cost of Replacement: If you deem the shirt “unwearable” due to a missing button, you might spend $20, $30, or much more to replace it.
Your Savings (per button): Easily 5−5−30+ by taking 5 minutes to fix it yourself. Multiply that by how many buttons pop off in a year!
The Fallen Hem Headscratcher:
DIY Cost (Fusible Tape): A roll of hem tape might cost 2−2−4 and can fix multiple hems.
DIY Cost (Hand Sewn): Again, just pennies for thread.
Cost of a Tailor: Hemming pants or a skirt professionally can range from 10−10−25+ per item.
Your Savings (per hem): 10−10−25 by choosing a simple DIY solution. If you have a few pairs of pants that need hemming after purchase, or if hems frequently fall, this adds up fast.
The Minor Rip or Seam Split:
DIY Cost: A tiny amount of thread.
Cost of a Tailor: Depending on the complexity, 10−10−20 for a simple seam repair.
Cost of Replacement: If the rip makes the item look shabby, you might replace it, costing whatever the garment is worth.
Your Savings: Significant, especially for favorite items you want to keep wearing.
The “Cost Per Wear” Power Play:
This is a concept I love. The “cost per wear” of a garment is its total price divided by the number of times you wear it. Every time you repair an item and extend its life, you decrease its cost per wear.
Example: A $60 pair of jeans worn 60 times has a cost per wear of $1. If a minor repair allows you to wear it another 60 times, you’ve effectively halved its cost per wear to $0.50! That’s smart money management.
Avoiding the “Disposable Fashion” Trap:
When you know how to do basic clothing repairs for beginners, you’re less likely to view clothes as disposable. This mindset shift alone can save you a fortune by curbing impulse buys of cheap, fast fashion meant to be worn a few times and then discarded. You start to value longevity and the items you already own.
The Cumulative Effect:
Individually, these might seem like small savings. But add them up over a year – a few buttons here, a hem there, a rescued seam – and you could easily be looking at saving $50, $100, or even more, depending on your wardrobe and how often these little issues arise. For students or anyone on a tight budget, that’s a significant amount that can be reallocated to other essentials or savings goals.
Mastering these simple skills isn’t just about being handy; it’s a direct investment in your financial well-being. It’s about taking control and making your money work harder for you by extending the life of what you already own.
8. Your Needle and Thread: Powerful Tools for a More Sustainable and Economical Wardrobe
And there you have it – a pragmatic, no-nonsense introduction to the world of basic clothing repairs for beginners. From assembling your thrifty sewing kit to confidently tackling loose buttons, minor tears, and fallen hems, you’re now equipped with the foundational skills to take control of your wardrobe’s longevity and, just as importantly, your clothing budget. Your needle and thread, as simple as they are, have just become powerful tools for cultivating a more sustainable and incredibly economical wardrobe.
No longer do you need to feel frustrated by small damages that render an otherwise perfectly good garment unwearable. You’ve seen how a few minutes and some straightforward stitches can rescue your favorite pieces, extend their life, and save you a significant amount of money in the process. This isn’t just about mending clothes; it’s about adopting a resourceful mindset, a problem-solving approach that values what you own and empowers you to be more self-sufficient.
I truly hope this guide has demystified basic sewing and shown you that these skills are well within your reach. Don’t be afraid to practice; your stitches don’t need to be perfect, just functional. Each button you reattach, each seam you mend, is a small victory for your wallet and a step away from the cycle of disposable fashion. So, keep that thrifty sewing kit handy, embrace the satisfaction of a successful repair, and enjoy the lasting benefits of your newfound (or newly refreshed!) mending abilities. Your wardrobe – and your bank account – will thank you for it!
9. FAQ: Your Basic Clothing Repairs Questions Answered
Here are some common questions that pop up when you’re starting to save money and clothes with basic mending:
1. I’ve never sewn anything before. Are these repairs really beginner-friendly?
Yes, absolutely! The repairs covered in this guide – like sewing on a button, fixing a small seam rip, or a quick hem fix – were chosen specifically because they are some of the simplest and most fundamental tasks in sewing. My step-by-step instructions are designed for someone with zero prior experience. Remember, the goal is functionality, not perfection, especially when you’re starting. A little practice will quickly build your confidence and skill!
2. What’s the absolute cheapest way to get started if I have nothing for a sewing kit?
You can get started very inexpensively! At a minimum, you’ll need:
A small pack of assorted hand-sewing needles (often just a dollar or two).
A small spool of all-purpose thread in a neutral color like black, white, or gray (also very cheap).
Any pair of small, sharp scissors you have (even nail scissors can cut thread in a pinch, though dedicated small craft scissors are better and still low-cost).
Many discount stores or craft sections offer very basic “emergency” sewing kits for just a few dollars that would contain these essentials.
3. How do I choose the right thread color if I don’t have an exact match?
For the most invisible repair, an exact match is ideal, but not always necessary for basic fixes, especially on less visible areas. Here’s a pragmatic approach:
For dark fabrics, choose a thread color that is slightly darker than the fabric.
For light fabrics, choose a thread color that is slightly lighter.
Neutral colors like gray, beige, or off-white often blend surprisingly well with a wide range of fabric colors. When in doubt, a thread that’s a shade darker tends to be less noticeable than one that’s too light.
4. My stitches look messy. Does it matter as long as the repair holds?
Honestly, for these basic clothing repairs for beginners, especially for internal seams or less visible mends, function is more important than perfect aesthetics. As long as your stitches are secure and the repair holds the garment together, you’ve succeeded! Your neatness and evenness will naturally improve with a little practice. Don’t let the pursuit of “perfect” stitches stop you from making a perfectly good, money-saving repair.
5. Besides saving money, are there other good reasons to learn basic clothing repairs?
Yes, definitely! While saving money is a huge benefit, learning basic repairs also:
Promotes Sustainability: You’re reducing textile waste by extending the life of your clothes instead of discarding them.
Boosts Self-Sufficiency: There’s a great sense of satisfaction and independence in being able to fix things yourself.
Preserves Sentimental Items: You can keep wearing beloved or meaningful garments for longer.
Allows for Simple Customization: While not covered in this guide, basic skills can lead to simple alterations or personalizations later on.
C. Holmes is the keen analytical mind behind Infinitas Minds, a blog dedicated to revolutionizing the way we approach home economics. With a meticulous eye for detail and a passion for logical solutions, C. Holmes tackles everyday challenges to reveal hidden opportunities for efficiency and savings. His mission is to simplify life, spark innovation, and offer practical, insightful approaches for navigating our often-complex world with greater ease and financial clarity.
Driven by a belief that true mastery of home economics lies in understanding the ‘why’ and ‘how’ behind every decision, C. Holmes curates comprehensive guides, actionable experiments, and groundbreaking perspectives. Expect a blend of sharp analysis, creative problem-solving, and a touch of ingenuity in every piece, empowering readers to transform their homes into havens of efficiency and peace.