
Is that relentless urban clamor or your neighbor’s late-night TV invading your sanctuary, making you dream of inventive DIY sound dampening for apartments? If you’re a light sleeper or simply sensitive to noise, you know how a little unwanted sound can disrupt your peace, focus, and well-being. Well, I’m here as your fellow creative problem-solver to tell you that reclaiming your apartment’s quiet corners doesn’t require expensive renovations or professional soundproofing.
We’re going to dive into some ingenious, budget-friendly, and surprisingly stylish ways to craft your own serene sanctuaries using materials you might already have or can easily find.
This isn’t about turning your apartment into a recording studio; it’s about smart, practical strategies to dampen and absorb those frustrating noises, creating portable “hush cocoons” and “wall whispers” that make a real difference.
I’ll share my favorite unconventional materials – think beyond just foam! – and guide you through a couple of core DIY projects, like crafting a sound-dampening screen and stylish acoustic panels. Plus, we’ll explore clever hacks for those common culprits: noisy windows, doors, and even floors, all with an eye on aesthetics because your quiet zone should also be a beautiful one.
We’ll touch on just enough basic sound science (no complicated physics, I promise!) so you understand why these DIY methods work. My goal is to empower you with the know-how and inspiration to transform your apartment into a more peaceful haven, one creative solution at a time. So, if you’re ready to say “shhh” to unwanted noise in a way that’s both effective and expresses your personal style, let’s get crafting!
1. Dreaming of a Quiet Nook? Why Your Apartment Needs a DIY Sound Dampening Zone (and How It’s Easier Than You Think!)
Are you constantly dreaming of a quiet nook in your apartment, a little personal bubble where the city’s hum or your neighbor’s footsteps fade into the background? If you’re a light sleeper or someone who’s particularly sensitive to noise, you know that this isn’t a luxury – it’s a necessity for well-being, concentration, and a good night’s rest.
The fantastic news is that creating these “sound escape zones” doesn’t require you to be a sound engineer or spend a fortune on professional soundproofing, especially if you’re renting or living in a small space where permanent changes are off-limits.
Your apartment absolutely needs, and deserves, these pockets of peace, and I’m here to show you how it’s easier than you think using creative, budget-friendly, and surprisingly stylish DIY sound dampening techniques.
The modern urban environment, as vibrant as it is, often comes with an unwelcome soundtrack. This constant auditory input can lead to:
- Increased Stress and Irritability: Our brains are always processing sound, even when we’re not consciously listening. Constant noise can keep our nervous system on alert.
- Difficulty Concentrating: Whether you’re working from home, studying, or just trying to read a book, unwanted sounds can shatter your focus.
- Poor Sleep Quality: This is a big one for light sleepers. Traffic, late-night conversations from next door, or even the hum of appliances can drastically reduce the quality of your rest.
- Reduced Sense of Privacy and Personal Space: Sometimes, you just want your own little world, undisturbed and undisturbing.
But here’s where your inner creative problem-solver comes in! Instead of feeling helpless against the noise, we can use inventive DIY sound dampening for apartments to reclaim our auditory environment. This isn’t about achieving total silence (which is often unrealistic in an apartment), but about significantly reducing and absorbing those jarring sounds to create zones of relative quiet and calm.
You don’t need a degree in acoustics; just a willingness to experiment with some everyday materials and a dash of ingenuity. We’re going to focus on solutions that are not only effective but also adaptable, often portable, and can even add a touch of unique style to your decor. Think of it as crafting your personal peace, one clever DIY at a time.
2. The Urban Sound Challenge: Understanding the Sneaky Noises in Your Apartment (No Degree in Acoustics Needed!)
To effectively tackle the urban sound challenge and quiet those sneaky noises in your apartment, it helps to understand a tiny bit about how sound works – but don’t worry, no degree in acoustics is needed! As a creative problem-solver, knowing your “enemy” (in this case, unwanted sound) allows you to choose your DIY weapons more effectively.
Different types of noises travel in different ways, and our goal with DIY sound dampening for apartments is to interrupt their journey before they reach your ears too loudly.
Let’s break down the common culprits in apartment living simply:
- Airborne Sound: The Chatty Traveler
- What it is: This is sound that travels through the air. Think voices from the next apartment, music, TV sounds, traffic noise from outside your window, or even the hum of your refrigerator.
- How it gets in: It seeps through gaps in windows and doors, thin walls, vents, and any unsealed openings.
- Our DIY Goal: To absorb this sound energy with soft, porous materials or to block its path with denser barriers where possible.
- Impact Sound (or Structure-Borne Sound): The Thumper
- What it is: This noise is created when an object hits a surface, causing vibrations that travel through the building’s structure. Think footsteps from the apartment above, a dropped object, a door slamming, or even bass from a neighbor’s stereo vibrating through the floor or walls.
- How it travels: It moves through floors, ceilings, walls, and even pipes. This type of sound is often trickier to deal with completely using only surface-level DIY.
- Our DIY Goal: To dampen these vibrations at the source if possible (e.g., a rug on your neighbor’s floor, though that’s out of your control), or to decouple or absorb the vibrations on your end. Thick, soft materials can help absorb some of this energy.
- Flanking Paths: The Sneaky Detours
- Sound is like water; it will find the easiest path. Even if you treat a wall, sound can travel around it through connected structures like floor joists, ceiling cavities, or ductwork. This is why achieving total “soundproofing” in an apartment is so complex.
- Our DIY Goal: While we can’t easily address all flanking paths with simple DIY, understanding they exist helps manage expectations. Our focus will be on treating the most direct paths and surfaces within our control to achieve noticeable dampening.
So, why does this matter for our DIY projects?
- Choosing Materials: Knowing that soft, porous, and thick materials are good at absorbing airborne sound helps us select things like heavy fabrics, felt, or even the internal structure of our DIY panels. Understanding that mass can help block sound informs why a heavy bookcase or a dense screen can make a difference.
- Designing Solutions: If you know sound is seeping under your door (airborne), a DIY door snake becomes an obvious solution. If you realize your bare walls are making voices echo (airborne sound reflecting), then adding soft panels or tapestries makes sense.
Our approach to DIY sound dampening for apartments isn’t about complex calculations. It’s about using this basic understanding to make smart, creative choices with everyday materials to significantly reduce the impact of these sneaky noises and help you reclaim your peace.
3. Your Secret Weapon Stash: Unconventional (and Stylish!) Materials for DIY Sound Dampening for Apartments
Alright, creative problem-solvers, now that we understand a bit about the enemy (pesky apartment noise!), it’s time to assemble your secret weapon stash: a collection of unconventional, budget-friendly, and surprisingly stylish materials perfect for DIY sound dampening for apartments.
Forget those expensive, industrial-looking acoustic panels you see in studios (unless you can snag some offcuts!). We’re diving into the world of readily available items, upcycled treasures, and everyday materials that, with a little ingenuity, can transform into effective sound soothers for your serene sanctuary.
The beauty of this approach is that you often don’t need to spend much, if anything at all. It’s about seeing the potential in what’s around you:
- Thick, Dense Fabrics – Your First Line of Defense:
- Why they work: Fabrics with weight and a dense weave are excellent at absorbing airborne sound waves, reducing echo and preventing sound from bouncing around a room.
- Your Stash:
- Heavy Curtains or Drapes: The heavier and more folds, the better. Velvet, corduroy, or lined blackout curtains are fantastic. Think beyond just windows – use them as wall hangings or room dividers.
- Old Quilts, Blankets, or Moving Blankets: These can be a goldmine! Use them as a core filling for DIY panels or screens, or drape them artistically.
- Tapestries or Large Fabric Wall Hangings: Combine sound absorption with a decorative statement.
- Thick Felt or Wool Fabric: Available at craft stores, great for covering panels or creating textured wall art.
- Porous and Textured Materials – Trapping Sound Waves:
- Why they work: Materials with lots of nooks, crannies, and open pores can trap and dissipate sound energy.
- Your Stash:
- Corkboard or Cork Tiles: Naturally porous and can look quite chic. Use for bulletin boards that double as sound dampeners, or create a feature wall.
- Foam (Upcycled is Best!): Think foam from old mattress toppers (cut to size), packaging foam (the dense kind, not crumbly styrofoam), or even pool noodles (cut and creatively arranged inside a frame).
- Egg Cartons (The Inside Story): Okay, let’s be real – plastering your walls with egg cartons isn’t the height of style. BUT, their bumpy, porous shape does diffuse sound. My trick? Use them as an internal structural or textural element within a DIY panel, hidden behind a more attractive fabric covering.
- Strategically Placed Soft Furnishings – Everyday Absorbers:
- Why they work: More soft surfaces mean more sound absorption.
- Your Stash:
- Plush Rugs (with a thick pad underneath!): Especially important for hard floors to reduce echo and some impact sound from below.
- Cushions, Pillows, Beanbag Chairs: Scatter them generously. They don’t just add comfort; they soak up sound.
- Upholstered Furniture: A fabric sofa will absorb more sound than a leather one.
- Bookshelves (Full of Books!) – The Unsung Heroes:
- Why they work: A bookshelf packed with books of varying sizes and depths acts as an excellent sound diffuser (scattering sound waves) and a decent sound barrier (adding mass to a wall). The irregular surfaces of the books help break up sound reflections.
- Plants with Dense Foliage – A Touch of Green Quiet:
- Why they work: While not a primary soundproofing solution, dense leafy plants can help to diffuse sound waves to a small degree and also add a sense of calm and visual softness, which contributes to the feeling of a peaceful space.
Remember, the key to effective DIY sound dampening for apartments with these materials is often about layering and density. One thin curtain won’t do much, but a heavy, lined one will. A single cushion helps a bit, but a sofa piled with them helps more. Get creative, look around your home for what you already own, and start seeing the sound-dampening potential in everyday (and stylish!) objects!
4. Project 1: The “Hush Cocoon” – Crafting a Portable Sound-Dampening Screen or Divider
Imagine this: you’re yearning for that quiet corner, a personal retreat from the everyday symphony of apartment living. What if you could conjure a pocket of calm on demand? That’s the magic of the “Hush Cocoon” – our first hands-on venture into practical DIY sound dampening for apartments.
This isn’t just a screen; it’s your portable sanctuary, a stylish testament to creative problem-solving that you can craft yourself. It’s designed to be moved where you need it most, perhaps to shield your reading nook from kitchen clatter or to create a more focused workspace, all while softening the edges of those intrusive airborne sounds.
The core idea is simple yet effective: a lightweight frame layered with sound-absorbing materials. It’s about creating a soft, yet substantial barrier that doesn’t just look good but actively works to make your space feel more serene.
Gathering Your ‘Hush Cocoon’ Supplies:
- For the Frame (Choose one route):
- Upcycled Find: An old, lightweight wooden room divider or screen (check out thrift stores or online marketplaces).
- DIY Wooden Frame: Inexpensive pine lumber (e.g., 1×2 inch boards) to create 2-3 rectangular panels, plus small hinges to connect them.
- PVC Pipe Frame: PVC pipes and corresponding elbow/T-joints for a modern, minimalist look (can be painted).
- For Sound Absorption & Aesthetics:
- Core Layer: Thick felt, an old (clean!) moving blanket, batting (like for quilts), or even layers of old towels or dense packing foam.
- Outer Fabric: A durable, attractive fabric that complements your decor. Think heavy cotton, canvas, corduroy, velvet, or even a sturdy linen. Choose enough to cover both sides of your panels.
- Tools & Fasteners:
- Measuring tape, scissors/fabric cutter, staple gun (and staples), screws/screwdriver (if building a wooden frame), strong adhesive/glue (optional, for securing foam layers), sewing machine or needle/thread (optional, for a more finished fabric edge).
Crafting Your Cocoon – A Step-by-Step Approach:
- Construct or Prepare Your Frame:
- If upcycling, ensure the old screen is clean and stable.
- If building with wood or PVC, carefully measure, cut, and assemble your panels to your desired height and width. Ensure they are sturdy and can be hinged together to stand freely.
- Layer on the Absorption:
- Cut your core sound-absorbing material (felt, blanket, foam) to fit snugly within each panel frame.
- Secure this core layer tightly to the frame. You might staple it directly or, if using foam, perhaps glue it first for stability before adding fabric. The goal is to create a dense, non-hollow panel.
- Upholster with Your Chosen Fabric:
- Measure and cut your outer fabric, leaving enough excess to wrap around the edges of each panel for a neat finish.
- Carefully stretch the fabric tautly over the panel (covering the core absorption layer) and secure it to the back of the frame using a staple gun. Work from the center outwards on each side to avoid puckering.
- Alternatively, you could sew fabric “pillowcases” for each panel for a removable, washable option, though this requires more sewing skill.
- Hinge Panels Together (if applicable):
- If you built multiple panels, attach them using your hinges so the screen can fold accordion-style.
The Result & Creative Flourishes:
You’ve now created your very own “Hush Cocoon”! This stylish divider not only adds a visual point of interest but also serves as your personal, movable sound-dampening zone. Don’t be afraid to personalize it further – perhaps paint the frame a bold color before upholstering, or add decorative trim or quilting to the fabric panels for extra visual and textural appeal. Position it, enjoy the reduced echo and muffled ambient noise, and relish the quiet you’ve cleverly crafted.
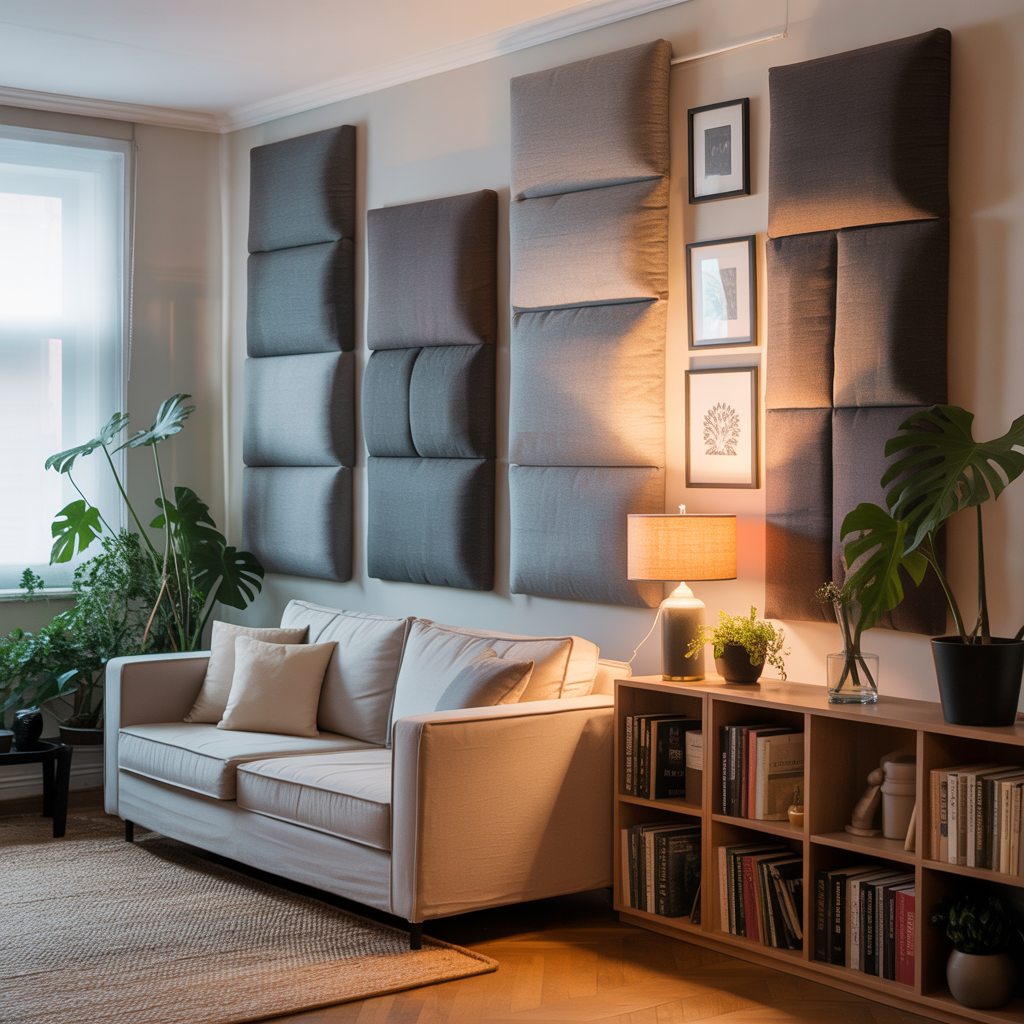
5. Project 2: “Wall Whispers” – Stylish DIY Acoustic Panels from Upcycled Finds
While our “Hush Cocoon” offers portable peace, sometimes you need a more permanent (yet still renter-friendly!) solution to tame those airborne sounds bouncing off your walls. Enter “Wall Whispers”: stylish, DIY acoustic panels crafted from upcycled finds that not only help absorb sound but can also double as unique pieces of art.
This project is all about transforming would-be trash into treasure, proving that effective DIY sound dampening for apartments can be both incredibly resourceful and aesthetically pleasing. Imagine turning old picture frames or even sturdy cardboard boxes into a gallery wall that actively makes your room quieter – that’s the creative problem-solving spirit we’re embracing!
These panels work by adding soft, porous surfaces to your walls, which helps to reduce echo and absorb some of the sound energy that would otherwise reflect around your space, making it feel less harsh and more serene.
Gathering Your ‘Wall Whisper’ Materials:
- For the Panel Base (Choose one or mix-and-match):
- Old Wooden Picture Frames or Canvas Stretchers: Thrift stores are goldmines for these! Any size works, depending on your vision.
- Shallow Wooden Boxes or Crates: Think old wine crates or shallow produce boxes, cleaned and perhaps lightly sanded.
- Sturdy Cardboard Boxes: Cut down to create flat, rigid panels (reinforce if needed).
- For the Sound-Absorbing Core:
- Old Towels or Thick Blankets: Cut to fit inside your chosen frame/base. Layers are good!
- Recycled Denim or Other Dense Fabrics: Old jeans can be deconstructed and layered.
- Acoustic Batting or Rockwool (Optional, with precautions): If you have access to these and are comfortable, they are very effective. Rockwool must be fully encased in fabric as the fibers can be irritant – handle with gloves and a mask. For most DIYers, simpler fabric layers are easier and safer.
- Foam (Dense Packing Foam or Old Mattress Topper): Cut to size.
- For the Decorative Covering:
- An attractive fabric of your choice: This will be the visible part, so pick something you love! Consider texture (burlap, linen, patterned cotton, felt) and color.
- Tools & Fasteners:
- Heavy-duty staple gun (and staples), strong scissors or a utility knife, measuring tape, possibly a hot glue gun (for securing some internal layers), and picture hanging hardware (D-rings, wire, or sawtooth hangers).
Crafting Your ‘Wall Whispers’ – Step by Step:
- Prepare Your Base:
- Clean your chosen frames or boxes. If using cardboard, ensure it’s flat and sturdy – you might need to glue a couple of layers together for rigidity.
- Fill with Absorbing Material:
- Cut your chosen core material(s) (towels, denim, foam, etc.) to fit snugly within the back cavity of your frame or box.
- Layer these materials to create as much density as you can without making the panel too bulky to hang. The aim is to fill the depth of the frame.
- Cover with Decorative Fabric:
- Lay your decorative fabric face down. Place your filled frame/base face down on top of it.
- Carefully cut the fabric, leaving a generous margin (2-3 inches at least) all around to wrap over the edges and onto the back.
- Starting with one side, pull the fabric taut (but not so tight it distorts the frame) and staple it securely to the back of the frame. Work from the center of each side outwards.
- Repeat for the opposite side, then the remaining two sides, ensuring the fabric is smooth and wrinkle-free on the front.
- Corners require neat folding, much like wrapping a present. Fold the excess fabric neatly and staple it down.
- Attach Hanging Hardware:
- Once your panel is covered, attach your chosen picture hanging hardware to the back so it’s ready to adorn your wall.
Arranging Your ‘Wall Whispers’ for Sound and Style:
Now for the really creative part! You can hang a single large panel as a statement piece, or create a gallery wall effect with multiple smaller panels of different sizes or complementary fabrics. Think about where sound reflects most in your room – often on large, bare walls opposite sound sources (like speakers or a TV). Placing your “Wall Whispers” strategically in these areas can make a noticeable difference in reducing echo and creating a more acoustically comfortable, and visually appealing, environment. You’ve just told those pesky sound waves to “whisper” instead of shout!
6. Beyond Panels and Screens: Clever Hacks for Quieter Windows, Doors, and Floors
While our DIY panels and screens are fantastic for tackling airborne sound reflecting off walls or creating personal quiet zones, your quest for a more serene apartment doesn’t stop there. As a resourceful creative problem-solver, you’ll want to address other common culprits: those sneaky drafts under doors, the way sound seems to pour through windows, or the echo bouncing off bare floors.
So, let’s go beyond panels and screens and explore some clever, often surprisingly simple, DIY sound dampening hacks for these specific areas. These small adjustments can collectively make a big difference in the overall acoustic comfort of your home.
Many of these solutions focus on two key principles we’ve touched on: blocking gaps where airborne sound can travel, and adding mass or soft, absorbent materials to reduce vibrations and reflections.
Taming Noisy Windows:
Windows are often major weak points for sound entry. Here’s how to muffle the outside world:
- The Power of Heavy Curtains (and Liners!): This is perhaps the easiest and most effective quick fix.
- What to use: Invest in thick, heavy curtains – velvet, lined blackout curtains, or even specialized (though pricier) acoustic curtains work best. The more fabric and the denser the weave, the more sound they’ll absorb.
- The Hack: Don’t just hang one layer! Double up by adding a separate heavy liner behind your existing curtains, or layer two sets of curtains. Ensure they extend well beyond the window frame on all sides and go as close to the floor as possible to trap more sound.
- DIY Removable Window Inserts/Plugs: For a more targeted approach, especially at night or when you really need focus:
- How it works: You create a snug-fitting panel that temporarily seals the window opening.
- Materials: Cut a piece of rigid foam board (like an insulation board from a hardware store, if budget allows, or even thick, layered cardboard) to the exact dimensions of your inner window frame. Wrap it in an attractive fabric for aesthetics. Add handles (like fabric loops) for easy insertion and removal. This creates an extra barrier against sound.
Silencing Drafty Doors:
Gaps around doors are notorious for letting sound (and drafts!) pass through.
- The Classic Door Snake/Draft Stopper:
- DIY It: Sew a long fabric tube and fill it with rice, dried beans, old fabric scraps, or even sand for weight. Place it snugly at the bottom of your door.
- Why it works: It physically blocks the gap, reducing airborne sound transmission.
- Weather Stripping – Not Just for Weather:
- What to use: Self-adhesive foam or rubber weather stripping (the kind used to seal windows and doors from drafts) can be applied around the inside of the door frame where the door meets the stop.
- The Benefit: It creates a tighter seal when the door is closed, significantly reducing sound leakage. This is a cheap and incredibly effective DIY sound dampening for apartments hack.
Quieting Echoey Floors:
Hard floors like wood, tile, or laminate can make a room sound echoey and amplify impact noise.
- Rugs, Rugs, and More Rugs (with a Secret Weapon!):
- The Obvious: Large, plush area rugs are your best friends here. The thicker, the better.
- The Hack: Always use a thick rug pad underneath. A dense felt or rubber pad not only adds cushioning but also significantly increases sound absorption and can help dampen some impact noise from your own movements or from below.
- Cork Flooring Tiles (Renter-Friendly Options):
- Consideration: If you’re looking for a more extensive but still often renter-friendly solution, interlocking cork floor tiles can be laid over existing hard floors. Cork is naturally sound-absorbent and feels warm underfoot. (Always check your lease agreement first!).
These “smaller” hacks, when combined with your DIY panels and screens, contribute to a layered approach to sound dampening. Each one tackles a different pathway for noise, collectively helping you craft that much-desired quieter, more peaceful apartment sanctuary.
7. Designing Your Serene Escape: Tips for Integrating Sound Dampening into Your Apartment Decor
You’ve embraced your inner creative problem-solver, amassed a stash of unconventional materials, and even crafted some ingenious DIY sound dampening projects. But the journey to your serene escape doesn’t end with just function; it blossoms with beautiful form! The fantastic truth about DIY sound dampening for apartments is that it absolutely does not have to look like a haphazard collection of “hacks.”
With a little thoughtful design, you can seamlessly integrate these sound-soothing elements into your apartment decor, making them intentional, stylish, and a true reflection of your personal taste. After all, a quiet space should also be an inviting and aesthetically pleasing one.
Here are my favorite tips for ensuring your sound-dampening efforts enhance, rather than detract from, your home’s style:
- Fabric Choices are Your Superpower:
- Color & Pattern Harmony: When selecting fabrics for your DIY acoustic panels, screens, or even heavy curtains, think about your existing color palette and decor style. Choose colors that complement your walls and furniture, or opt for patterns that add a pop of personality without clashing. A well-chosen fabric can turn a functional panel into a piece of art.
- Texture, Texture, Texture!: Sound-dampening often involves soft, textured materials. Embrace this! Velvets, chunky knits, corduroy, linen, and even quilted fabrics not only absorb sound but also add warmth, depth, and a cozy, inviting feel to your space. Layering different textures can create a rich, sophisticated look.
- Strategic Placement as a Design Element:
- Gallery Wall of Quiet: Don’t just hang one acoustic panel randomly. Arrange multiple smaller “Wall Whispers” in a gallery wall formation. Mix sizes, shapes, and complementary fabrics for a dynamic and artistic display that also serves a powerful acoustic purpose.
- Feature a Statement Screen: Your “Hush Cocoon” screen can be more than just a sound barrier; it can be a focal point. Choose a stunning fabric or paint the frame a bold color to make it a deliberate design choice.
- Bookshelves as Beautiful Barriers: We know bookshelves full of books help with sound. Style them artfully! Mix books with decorative objects, vary the orientation of books (some vertical, some stacked horizontally), and consider the color of the spines to create a visually appealing and acoustically beneficial feature wall.
- Hiding in Plain Sight – Clever Camouflage:
- Sometimes, you want the sound dampening without the elements being too obvious.
- Behind a Large Plant: Tuck a less decorative (but functional) panel behind a tall, leafy plant.
- Underneath Furniture: A thick rug pad is hidden, but a layer of cork or felt under a low sofa or bed (if space allows) can also subtly help.
- Integrated into Headboards: If you’re really DIY-savvy, you could incorporate fabric-covered absorbing materials into a custom headboard design.
- Sometimes, you want the sound dampening without the elements being too obvious.
- The Art of Layering – Acoustic and Visual Depth:
- Just as layering clothes keeps you warm, layering materials helps with sound. Think a rug on the floor, heavy curtains at the window, soft throws on the sofa, and fabric panels on the wall. This creates both acoustic and visual depth, making a room feel more complete, cozy, and (importantly for us) quieter.
- Make Your “Quiet Zone” a Destination:
- Don’t just dampen sound; create an experience. If you’ve made a quiet reading nook with your DIY screen, add a comfy chair, a soft lamp, a small side table, and a plant. Turn your sound-dampened area into a beautiful and inviting mini-retreat within your home.
By consciously thinking about design from the outset, your DIY sound dampening for apartments projects will feel less like a necessity and more like an exciting opportunity to enhance your home’s comfort and style. Your serene escape should be a place you love to be in, for both its peace and its personality.
8. Your Peaceful Apartment Awaits: Embrace Your Inner Creative Problem-Solver!
And just like that, you’ve journeyed through the world of inventive DIY sound dampening for apartments, armed with a little bit of science, a stash of unconventional materials, and, most importantly, your own incredible ingenuity!
From understanding those sneaky urban noises to crafting stylish “Hush Cocoons” and “Wall Whispers,” I hope you’re now brimming with ideas and feeling empowered to tackle the sound challenges in your own space. Your peaceful apartment truly awaits, and the key to unlocking it lies in embracing your inner creative problem-solver.
Remember, the goal here isn’t to achieve an anechoic chamber’s silence – that’s neither practical nor desirable for most home environments. It’s about making a noticeable difference, about carving out those precious zones of calm where you can relax, focus, and recharge without the constant intrusion of unwanted noise.
The beauty of the DIY approach is its adaptability; you can tailor these solutions to your specific needs, your budget, and your unique aesthetic. Don’t be afraid to experiment with different materials, layer your creations, and put your personal stamp on every project.
The most rewarding part of this journey is often the process itself – the satisfaction of transforming everyday items into something both beautiful and functional, of solving a real-world problem with your own two hands.
So, take these ideas as a starting point, let your imagination run wild, and start crafting your serene sanctuary. That quieter, more comfortable apartment isn’t just a dream; it’s a project waiting for your creative touch. Go forth and create your peace!
9. FAQ: Your DIY Sound Dampening Questions Answered
Here are some common questions that might pop up as you embark on your creative sound-dampening adventures:
1. Will these DIY methods completely soundproof my apartment?
It’s important to have realistic expectations: these DIY sound dampening for apartments techniques are designed for sound dampening (reducing and absorbing noise, lessening echo) to create noticeably quieter zones, not complete soundproofing. True soundproofing often involves structural changes and specialized, expensive materials to fully isolate a room. My methods aim to provide significant relief and create serene sanctuaries using accessible and budget-friendly approaches, making your apartment much more comfortable.
2. How do I know which DIY sound dampening project to start with?
Consider these factors:
- Your Biggest Noise Annoyance: Is it general echo (try wall panels), noise from a specific direction (a screen might help), or drafts under a door?
- Your Space: Do you need something portable (screen) or can you dedicate wall space (panels)?
- Your DIY Comfort Level & Time: Some projects, like adding heavy curtains or a door snake, are very quick. Building panels might take a bit more time.
I usually suggest starting with the project that addresses your most pressing noise issue or the one that feels most achievable for a quick win!
3. Are there any safety concerns when working with these upcycled materials for sound dampening?
Generally, these projects are quite safe. However, always use common sense:
- Cleanliness: Ensure any upcycled fabrics, foams, or organic materials (like old textiles) are thoroughly clean and free from mold, mildew, or pests before bringing them into your project.
- Tool Safety: Always handle tools like staple guns, scissors, or utility knives with care according to their instructions.
- Ventilation: If you’re painting or using adhesives, work in a well-ventilated area.
- Specialized Materials (If Used): If you opt for something like rockwool (which I mentioned as an optional core for panels), it must be fully encased and you should wear gloves, a mask, and long sleeves during handling as the fibers can be irritant. For most of these projects, simpler, safer materials are perfectly adequate.
4. Can these DIY solutions also help with sound I make, to avoid disturbing my neighbors?
Yes, to a certain extent! The same principles of sound absorption and blocking that help reduce noise coming into your apartment can also help reduce the amount of sound leaving it. Soft furnishings, DIY panels, heavy curtains, and sealing gaps around doors can help muffle your own TV, music, or conversations, particularly airborne sounds. While not a substitute for being a considerate neighbor, these techniques can certainly contribute to a more peaceful co-existence.
5. How much of a difference can I realistically expect these DIY sound dampening techniques to make?
The difference can be quite noticeable and satisfying, but it will vary based on several factors: the type and intensity of the noise, your apartment’s construction, the specific materials you use, and how extensively you apply these techniques. You likely won’t achieve total silence, but you can realistically expect a significant reduction in echo, a muffling of irritating background noises, and the creation of “islands of tranquility” where you feel more relaxed and focused. The key is often a layered approach – the more sound-dampening elements you incorporate, the greater the cumulative effect. Experiment and see what works best for your unique space!
C. Holmes is the keen analytical mind behind Infinitas Minds, a blog dedicated to revolutionizing the way we approach home economics. With a meticulous eye for detail and a passion for logical solutions, C. Holmes tackles everyday challenges to reveal hidden opportunities for efficiency and savings. His mission is to simplify life, spark innovation, and offer practical, insightful approaches for navigating our often-complex world with greater ease and financial clarity.
Driven by a belief that true mastery of home economics lies in understanding the ‘why’ and ‘how’ behind every decision, C. Holmes curates comprehensive guides, actionable experiments, and groundbreaking perspectives. Expect a blend of sharp analysis, creative problem-solving, and a touch of ingenuity in every piece, empowering readers to transform their homes into havens of efficiency and peace.